
MySQL主从集群配置
MySQL服务的主从架构是通过binlog日志文件来实现的。使用MySQL做读写分离配置时,就必须基于主从架构来搭建,主节点用来写入数据,从节点用来读取数据。
- 在主服务节点上开启binlog日志,用来记录每一步数据库的操作。
- 然后在从服务节点上,就会有一个IO线程,负责跟主服务建立一个TCP连接,用来请求主服务,获取最新的binlog日志。
- 主服务节点上会有一个IO dump线程,专门负责讲binlog日志传输给从节点服务。
- 接着从节点服务的IO线程会把读取到的binlog日志数据写入自己的relay日志文件中。
- 然后从节点服务上另外一个线程会读取relay日志里的内容,进行操作重演,达到数据还原的目的。
MySQL主从集群配置
先安装单机版mysql数据库
操作流程: MySQL数据库安装部署
单机版改造为主从模式
主节点
master主节点服务的my.cnf配置
# For advice on how to change settings please see
# http://dev.mysql.com/doc/refman/8.0/en/server-configuration-defaults.html

[mysqld]
# 主库需要和从库不一致
server-id=47
# 开启binlog日志
log_bin=master-bin
log_bin-index=master-bin.index
# 设置服务连接端口
port=3306
# 跳过域名解析,只接受客户端使用ip地址进行认证
skip-name-resolve
#
# Remove leading # and set to the amount of RAM for the most important data
# cache in MySQL. Start at 70% of total RAM for dedicated server, else 10%.
# innodb_buffer_pool_size = 128M
innodb_buffer_pool_size = 1024M
#
# Remove the leading "# " to disable binary logging
# Binary logging captures changes between backups and is enabled by
# default. It's default setting is log_bin=binlog
# disable_log_bin
#
# Remove leading # to set options mainly useful for reporting servers.
# The server defaults are faster for transactions and fast SELECTs.
# Adjust sizes as needed, experiment to find the optimal values.
# join_buffer_size = 128M
# sort_buffer_size = 2M
# read_rnd_buffer_size = 2M
join_buffer_size = 256KB
sort_buffer_size = 512KB
read_rnd_buffer_size = 256KB
#
# Remove leading # to revert to previous value for default_authentication_plugin,
# this will increase compatibility with older clients. For background, see:
# https://dev.mysql.com/doc/refman/8.0/en/server-system-variables.html#sysvar_default_authentication_plugin
# default-authentication-plugin=mysql_native_password

datadir=/var/lib/mysql
socket=/var/lib/mysql/mysql.sock

log-error=/var/log/mysqld.log
pid-file=/var/run/mysqld/mysqld.pid


# 允许最大连接数
max_connections=200
# 允许连接失败的次数。这是为了防止有人从该主机试图攻击数据库系统
max_connect_errors=10
# 服务端使用的字符集默认为UTF8
character-set-server=utf8
启动主节点的mysql服务
启动服务命令
service mysqld restart重启服务命令
service mysqld start查看服务状态
service mysqld statusmaster 主节点相关命令
# 查看主节点信息
show master status ;

# 创建指定用户
create user 'replication_user'@'%' identified by 'acd5432';

# 授予指定用户复制所有数据库和表的相关操作(一般用于主从复制)
grant replication slave on *.* to 'replication_user'@'%';

# 刷新权限以确保立即生效
flush privileges ;
从节点
slave从节点服务的my.cnf配置
[mysqld]
#主库和从库要不一致
server-id=48
# 打开MySQL中继日志
relay-log-index=slave-relay-bin.index
relay-log=slave-relay-bin
# 打开从服务二进制日志
log-bin=mysql-bin
#
log-slave-updates=1
#
port=3306
#
# Remove leading # and set to the amount of RAM for the most important data
# cache in MySQL. Start at 70% of total RAM for dedicated server, else 10%.
# innodb_buffer_pool_size = 128M
innodb_buffer_pool_size = 512M
#
# Remove the leading "# " to disable binary logging
# Binary logging captures changes between backups and is enabled by
# default. It's default setting is log_bin=binlog
# disable_log_bin
#
# Remove leading # to set options mainly useful for reporting servers.
# The server defaults are faster for transactions and fast SELECTs.
# Adjust sizes as needed, experiment to find the optimal values.
# join_buffer_size = 128M
# sort_buffer_size = 2M
# read_rnd_buffer_size = 2M
join_buffer_size = 256KB
sort_buffer_size = 512KB
read_rnd_buffer_size = 256KB
#
# Remove leading # to revert to previous value for default_authentication_plugin,
# this will increase compatibility with older clients. For background, see:
# https://dev.mysql.com/doc/refman/8.0/en/server-system-variables.html#sysvar_default_authentication_plugin
# default-authentication-plugin=mysql_native_password

datadir=/var/lib/mysql
socket=/var/lib/mysql/mysql.sock

log-error=/var/log/mysqld.log
pid-file=/var/run/mysqld/mysqld.pid


# 允许最大连接数
max_connections=200
# # 允许连接失败的次数。这是为了防止有人从该主机试图攻击数据库系统
max_connect_errors=10
# # 服务端使用的字符集默认为UTF8
character-set-server=utf8
启动从节点的mysql服务
启动服务命令
service mysqld restart重启服务命令
service mysqld start查看服务状态
service mysqld statusslave 从节点相关命令
下面命令中的
change master指令中需要指定的master_log_file和master_log_pos必须和上面master主节点中使用show master status命令查到的保持一致。
# 设置同步主节点
change master to
    master_host = '10.0.20.12',
    master_port = 3306,
    master_user = 'replication_user',
    master_password = 'acd5432',
    master_log_file = 'master-bin.000002',
    master_log_pos = 6580,
    get_master_public_key = 1;

# 开启slave从节点
start slave ;

# 关闭从节点
stop slave ;

# 查看从节点的主从同步状态
show slave status ;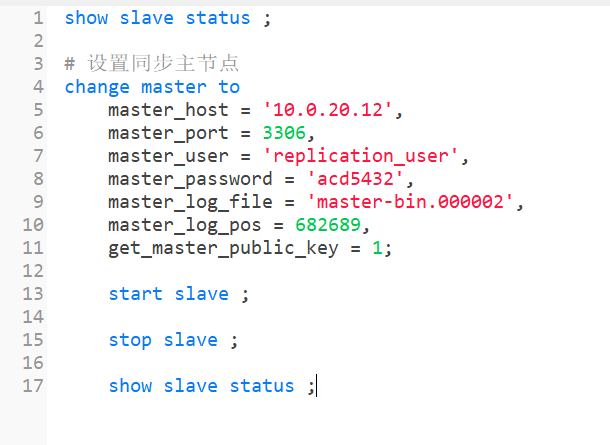
主从集群搭建完毕
验证主从集群
在master主节点进行数据操作,会同步更新到从节点。
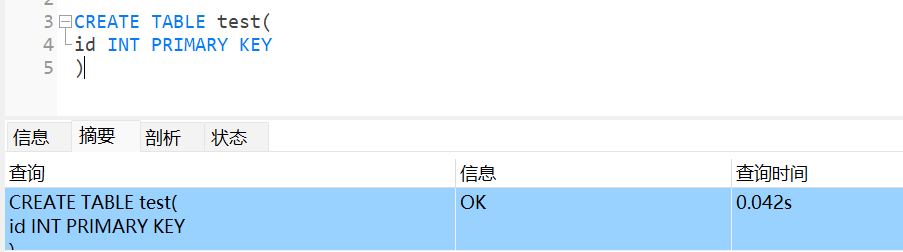
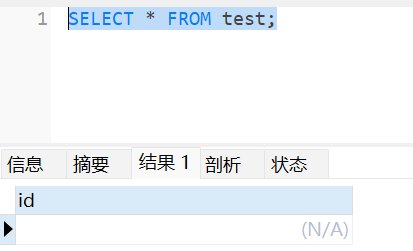
测试1
在主节点创建一个表
在从节点查看表
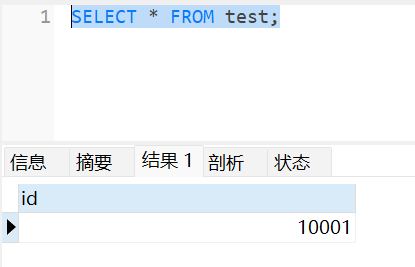
测试2
在主节点新增数据

在从节点查看数据
注意事项
主从集群不能在从节点进行数据操作,从节点的数据是不会反向同步到主节点的,所以一般以从节点作为 读库 ,主节点作为 写库 ,这就是常说的读写分离。
集群扩容
现在已经存在了master主节点,且此时master主节点已经有了很多数据,此时再想给这个master主节点加上一个slave从节点,会有如下问题,之前数据是无法通过binlog来恢复的,这时候加新的slave节点时,需要在从节点执行 change master 命令前,额外增加一个数据复制操作,需要将master主节点当前的数据全部手动同步到slave节点。(最好停止所有应用服务再去操作,防止手动数据同步期间还有新的数据入库)
手动同步数据操作方式如下
在master主节点导出需要同步的数据库数据
mysqldump -u root -p 数据库名称 > 数据库名称_backup.sql在slave从节点执行master主节点导出的脚本
mysql -u root -p 数据库名称 < 数据库名称_backup.sql将历史的业务数据导入到slave从节点之后,从节点就可以再继续按照上文的步骤执行 change master 等命令了。
全库同步和部分同步
上文目前的配置是slave从节点是会同步master主节点的全库,在实际环境中可能只需要同步master主节点的其中一个或数个库
操作方式如下:
先在masterr主节点的mysql的 my.cnf(默认地址:/etc/my.cnf) 里加上如下配置
# 设置只同步库名为dbName1和dbName2的库
binlog-do-db=dbName1
binlog-do-db=dbName2
然后在slave从节点的mysql的 my.cnf(默认地址:/etc/my.cnf) 里加上如下配置
replicate-do-db=dbName1
replicate-do-db=dbName2
如果masterr主节点和slave从节点的库名不相同,可在slave从节点的mysql的
my.cnf添加如下配置replicate-rewrite-db=dbName > dbName1
注意:该在MySQL的新版本中已经被废弃,在MySQL 5.7及以后的版本中,使用这个选项可能会收到警告,并且在未来的MySQL版本中可能会被移除。所以最好保持主从数据库的库名一致。
如果不是 dbName1 库的所有表数据都同步,只需要需要同步指定的数据表,则可以在slave从节点的mysql的 my.cnf 配置文件中加上如下配置
# 如果没有指定则默认是全部表同步的(下面配置只同步dbName1库的tableName1和tableName2两个表)
replicate-wild-do-table=dbName1.tableName1
replicate-wild-do-table=dbName1.tableName2
自动清理binlog日志
在实际环境中binlog日志是很大,为防止大量占用磁盘资源,可以在master主节点的 my.cnf 加上如下配置
# 设置只保留7天的二进制日志
expire-logs-days=7